Windows 下超快 Python 包管理器 uv 安装教程
Python 的传统包管理器 pip 安装速度慢、虚拟环境麻烦?别急,今天介绍一个 Rust 编写的现代化包管理器 —— uv,它比 pip 快 10 倍以上,还原生支持虚拟环境、锁文件、缓存优化等功能。
本文将手把手教你如何在 Windows 系统中安装并使用 uv,适合 Python 开发者、数据科学工程师、自动化爱好者。
什么是 uv?
uv 是由 Astral 开发的 Python 包管理工具,目标是替代:
pip(安装依赖)
virtualenv/venv(创建虚拟环境)
pip-tools(生成 requirements.txt)
并做到更快、更简单!
官网地址
https://docs.astral.sh/uv/getting-started/installation/#installation-methods
github地址:
https://github.com/astral-sh/uv/releases
安装uv
方法一:windows 使用 PowerShell 一键安装(推荐 💡)
🛠️ 步骤:
- 打开 PowerShell
可以在“开始菜单”中搜索 PowerShell
右键 → 以管理员身份运行(推荐)
执行以下命令安装 uv:
PS C:\Users\Administrator> powershell -ExecutionPolicy ByPass -c "irm https://astral.sh/uv/install.ps1 | iex"
Downloading uv 0.7.13 (x86_64-pc-windows-msvc)
Installing to C:\Users\Administrator\.local\bin
  uv.exe
  uvx.exe
  uvw.exe
everything's installed!

To add C:\Users\Administrator\.local\bin to your PATH, either restart your shell or run:

    set Path=C:\Users\Administrator\.local\bin;%Path%   (cmd)
$env:Path = "C:\Users\Administrator\.local\bin;$env:Path" (powershell)这个脚本执行完后,会下载文件到以下目录C:\Users\Administrator\.local\bin
- 并添加到环境变量
PS C:\Users\Administrator>  $env:Path = "C:\Users\Administrator\.local\bin;$env:Path"
PS C:\Users\Administrator> uv --version
uv 0.7.13 (62ed17b23 2025-06-12)
PS C:\Users\Administrator> uv -h
An extremely fast Python package manager.

Usage: uv.exe [OPTIONS] <COMMAND>

Commands:
  run      Run a command or script
  init     Create a new project
  add      Add dependencies to the project
  remove   Remove dependencies from the project
  version  Read or update the project's version
  sync     Update the project's environment
  lock     Update the project's lockfile
  export   Export the project's lockfile to an alternate format
  tree     Display the project's dependency tree
  tool     Run and install commands provided by Python packages
  python   Manage Python versions and installations
  pip      Manage Python packages with a pip-compatible interface
  venv     Create a virtual environment
  build    Build Python packages into source distributions and wheels
  publish  Upload distributions to an index
  cache    Manage uv's cache
  self     Manage the uv executable
  help     Display documentation for a command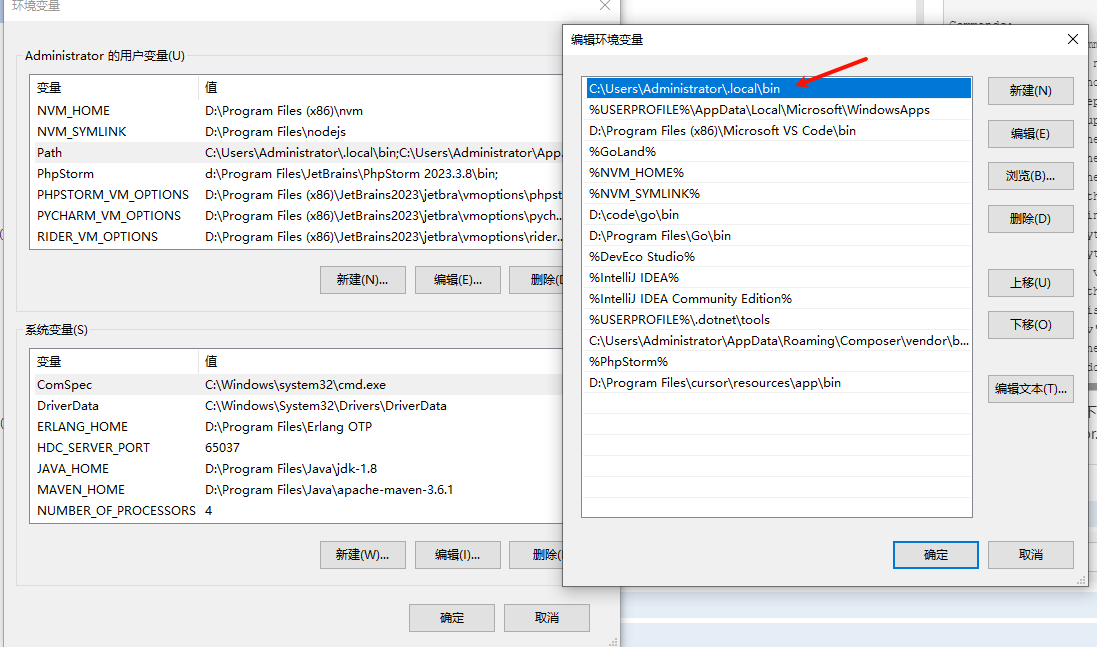
方法二:手动下载安装包(适合不想用脚本的同学)
访问下载地址:uv Releases
https://github.com/astral-sh/uv/releases
找到你的平台对应版本.
- Windows 64 位一般下载这个:
uv-x86_64-pc-windows-msvc.zip x64 Windows
解压后会得到一个 uv.exe 文件。
将 uv.exe 放入某个路径,并把该路径加入系统环境变量 Path
- linux下载二进制包版本:
https://gitee.com/jiang-jixin/uv/releases/download/0.8.0/uv-x86_64-unknown-linux-gnu.tar.gz
新建以下目录
mkdir -p {/uv/cache,/uv/tools,~/customPythonPath}
linux把uv设置为环境变量
编辑下面文件
sudo vim /etc/profile
写入下面的内容
# add python pyth
export PYTHON_PATH="/usr/local/uv-x86_64-unknown-linux-gnu"
export PATH=$PATH:$PYTHON_PATH

export PATH="/root/.local/bin:$PATH

export UV_PYTHON_INSTALL_DIR="$HOME/uv/customPythonPath"
export UV_CACHE_DIR="$HOME/uv/cache"
export UV_TOOL_DIR="$HOME/uv/tools"
export UV_PYTHON_INSTALL_MIRROR="https://gh-proxy.com/github.com/astral-sh/python-build-standalone/releases/download/"
载入更改
source /etc/profile
方法三: Mac和Linux系统可以用这条命令:curl -LsSf https://astral.sh/uv/install.sh | sh
卸载uv
缓存文件卸载命令:
Remove-Item -Recurse -Force “$(uv python dir)”
Remove-Item -Recurse -Force “$(uv tool dir)”
uv卸载命令:
Remove-Item “$env:USERPROFILE.local\bin\uv.exe” -Force
Remove-Item “$env:USERPROFILE.local\bin\uvx.exe” -Force
uv删除当前项目下的环境目录(powershell终端)
Remove-Item -Recurse -Force ..venv
bash终端用下面的命令
Administrator@WIN-20240929XKQ MINGW64 /d/code/pyton/uv_demo (master)
$ rm -rf ./.venv
参考文档
https://blog.csdn.net/qq_55666050/article/details/148586532
uv更换全局pypi镜像源
uv更换全局pypi镜像源
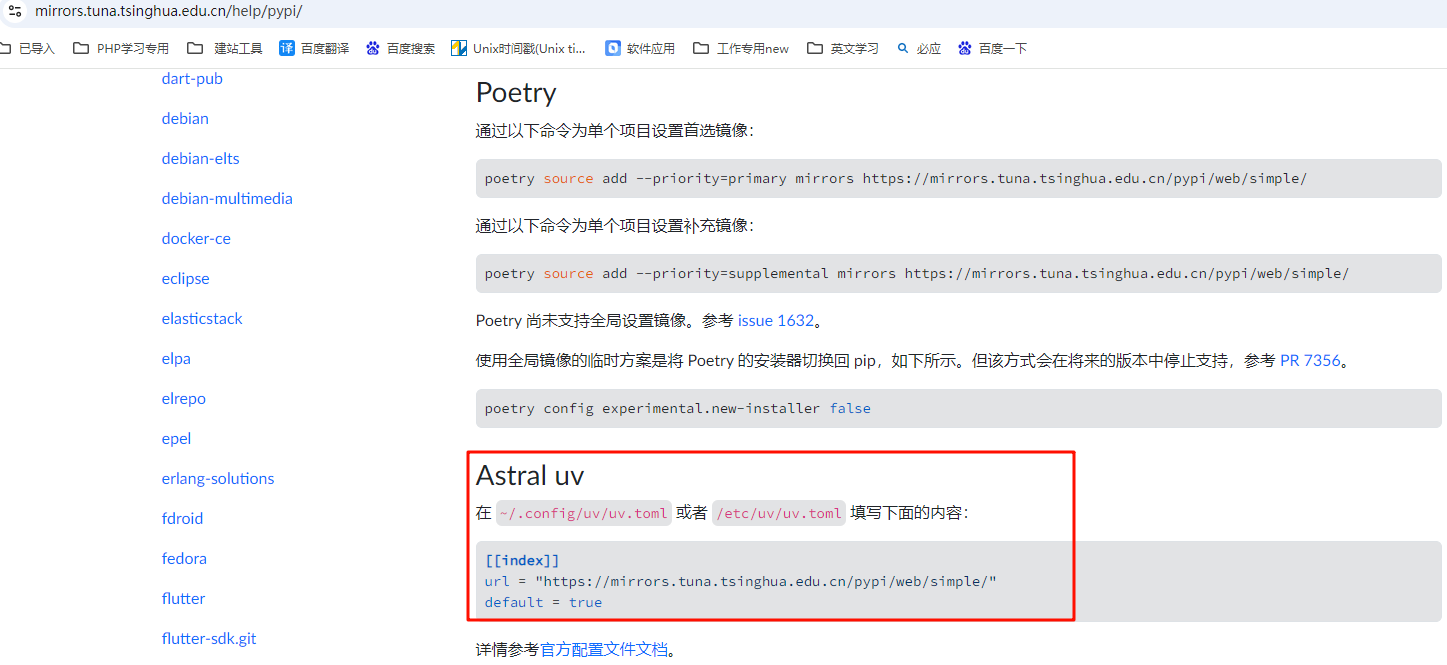
清华源网站
https://mirrors.tuna.tsinghua.edu.cn/help/pypi/
实操:
mkdir ~/.config/uv && vim ~/.config/uv/uv.toml
写入以下配置项即可
[[index]]
# url = "https://pypi.mirrors.ustc.edu.cn/simple/"
url = "https://mirrors.tuna.tsinghua.edu.cn/pypi/web/simple/"
default = true
参考文档:
https://www.cnblogs.com/Flat-White/p/18920080
常用命令:
指定python安装目录,自己提前新建出这个目录:
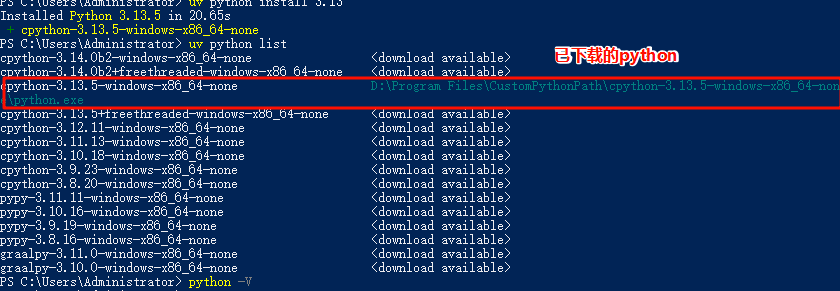
$env:UV_PYTHON_INSTALL_DIR = "D:\Program Files\CustomPythonPath"
macOs下执行命令加入环境变量:echo 'export UV_PYTHON_INSTALL_DIR="/Users/yourusername/CustomPythonPath"' >> ~/.zshrc && source ~/.zshrc查看是否设置成功:
echo $UV_PYTHON_INSTALL_DIR查看版本列表:
uv python list安装python 3.13:
uv python install 3.13这里会下载到上面指定的目录中
固定到特定的 Python
版本: uv python pin 3.13卸载python版本:
uv python uninstall 3.13安装老版本的项目依赖包:
uv add -r requirements.txt
查看 python 安装的目录位置
# 查找python的安装情况
C:\Users\Administrator\AppData\Roaming\uv\python>uv python find
C:\Users\Administrator\AppData\Roaming\uv\python\cpython-3.10.18-windows-x86_64-none\python.exe

# 显示uv python的安装目录
C:\Users\Administrator\AppData\Roaming\uv\python>uv python dir
C:\Users\Administrator\AppData\Roaming\uv\python

C:\Users\Administrator\AppData\Roaming\uv\python>dir
 驱动器 C 中的卷没有标签。
 卷的序列号是 86A0-C31E

 C:\Users\Administrator\AppData\Roaming\uv\python 的目录

2025/07/12/周六  12:35    <DIR>          .
2025/07/12/周六  12:35    <DIR>          ..
2025/06/15/周日  00:06                 1 .gitignore
2025/06/15/周日  00:06                 0 .lock
2025/07/12/周六  12:35    <DIR>          .temp
2025/07/12/周六  12:35    <DIR>          cpython-3.10.18-windows-x86_64-none
2025/06/15/周日  01:59    <DIR>          cpython-3.12.11-windows-x86_64-none
2025/06/15/周日  00:07    <DIR>          cpython-3.13.5-windows-x86_64-none
创建一个项目
方法一:
使用uv命令创建一个python项目:uv init python_lianxi123
使用pycharm打开该项目之后,显示如下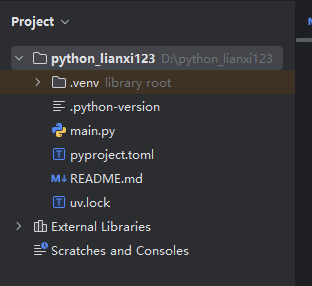
方法二:
如果文件夹已经创建,可以使用uv init命令,直接设置虚拟环境和其他配置
- 新建一个
D:\code\pyton\uv_demo目录 - 用vs_code打开目录
- 在命令行中执行
uv init
Administrator@WIN-20240929XKQ MINGW64 /d/code/pyton/uv_demo
$ uv init
Initialized project `uv-demo`

Administrator@WIN-20240929XKQ MINGW64 /d/code/pyton/uv_demo (master)
$ tree
.
|-- README.md
|-- main.py
|-- pyproject.toml 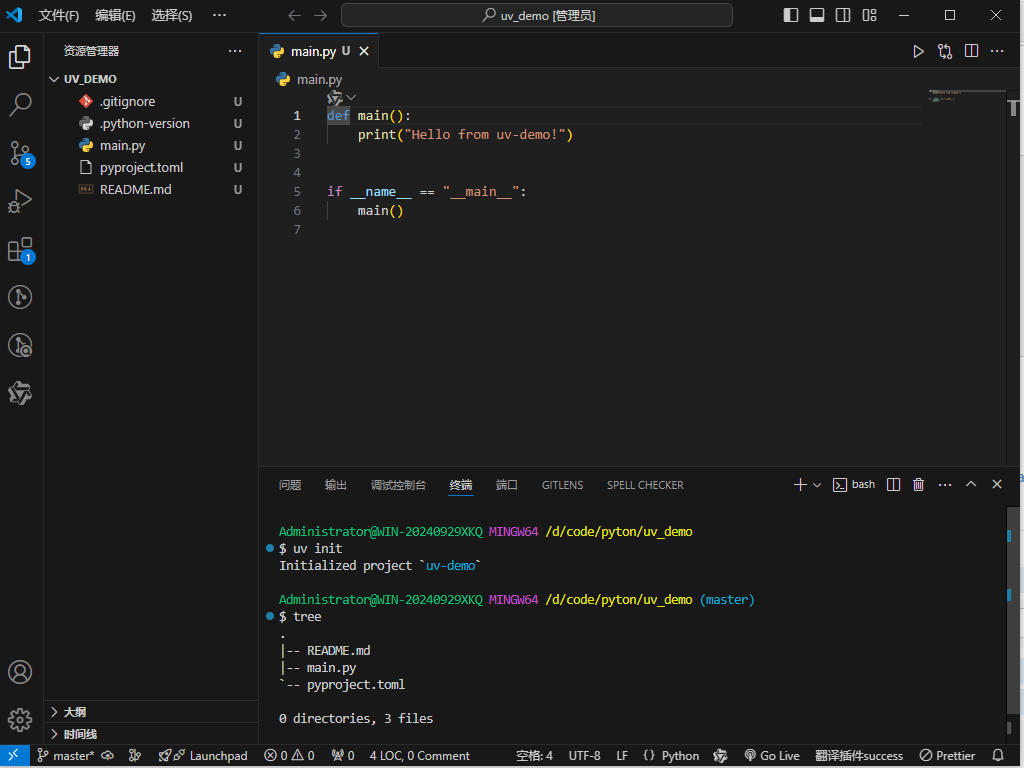
如果电脑安装了多个python版本,比如我安装了3.12和3.13,如果想固定某一个python版本,可以使用:uv python pin 3.12 (单词pin是:针的意思,就是钉住某一版本)
然后用UV命令创建的python项目就会是3.12版本
- 安装python插件
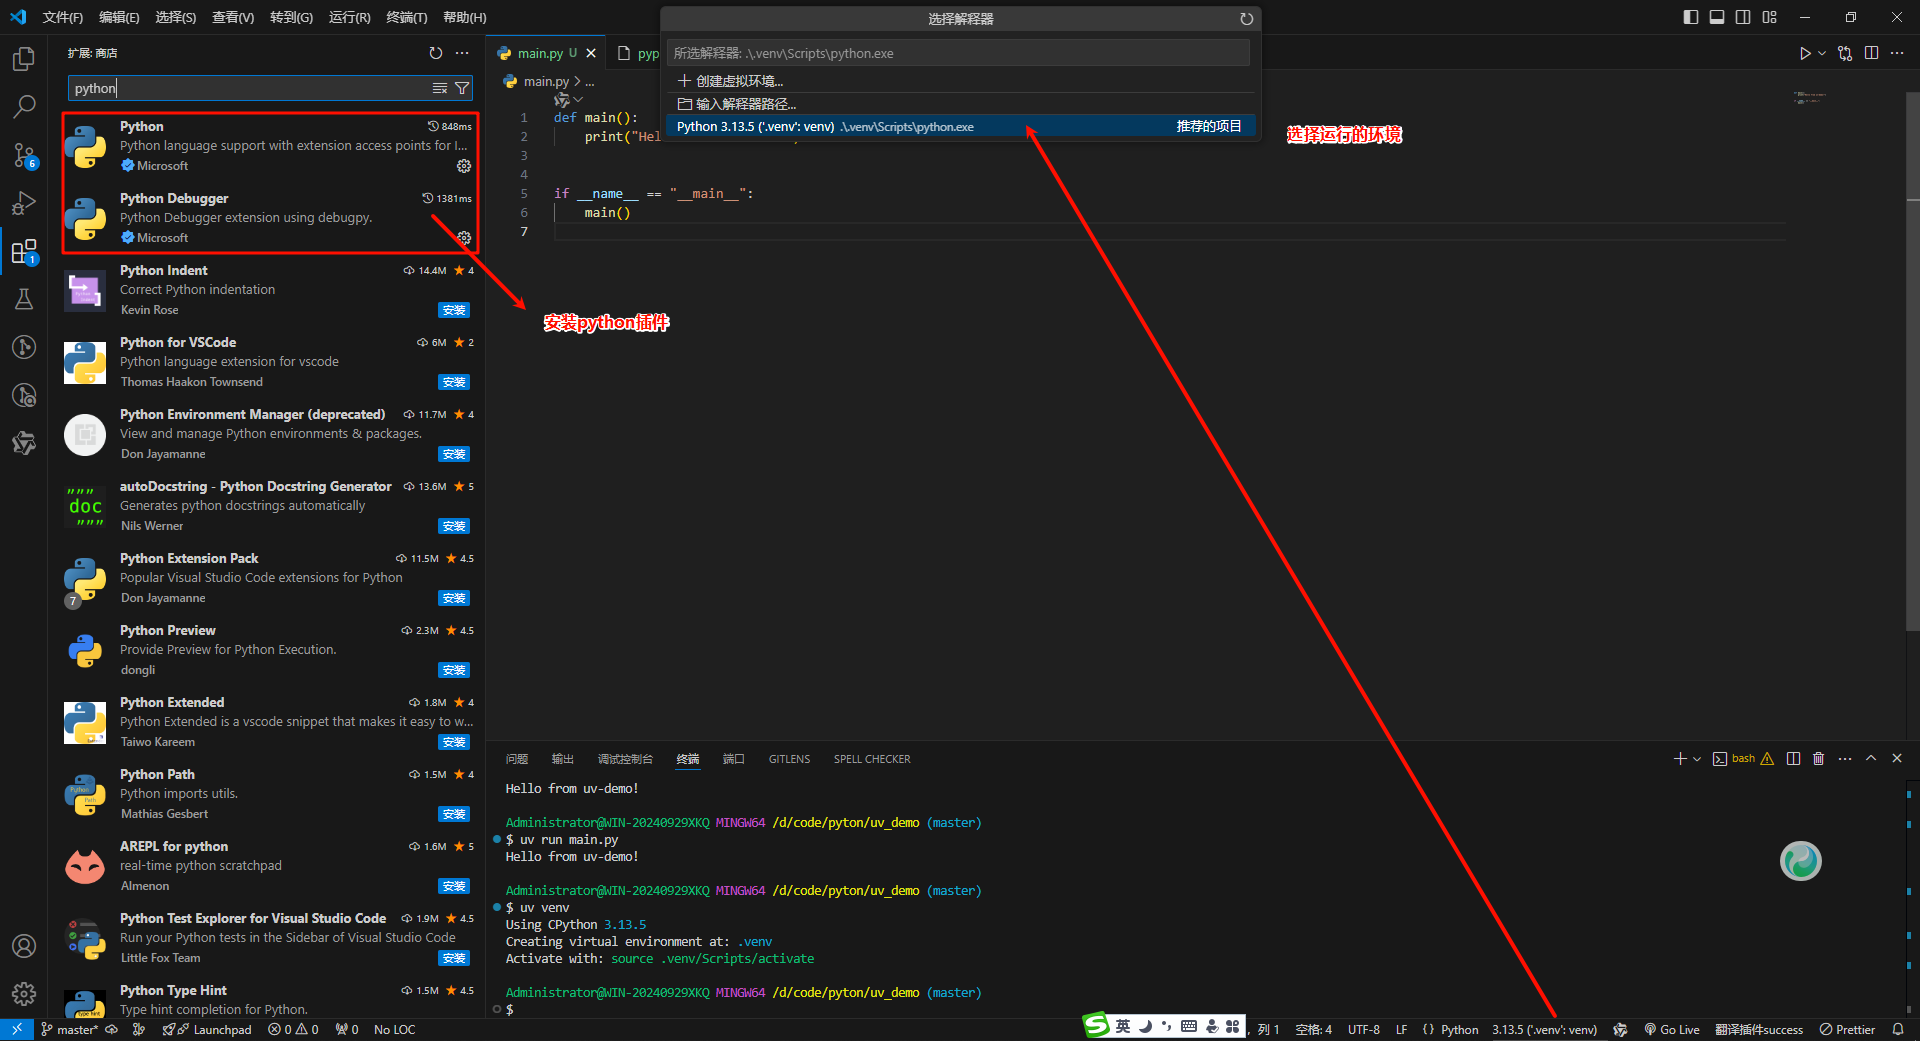
- 如果项目根目录下没有.venv目录,执行下面的命令,创建项目虚拟环境
Administrator@WIN-20240929XKQ MINGW64 /d/code/pyton/uv_demo (master)
$ uv venv
Using CPython 3.13.5
Creating virtual environment at: .venv
Activate with: source .venv/Scripts/activate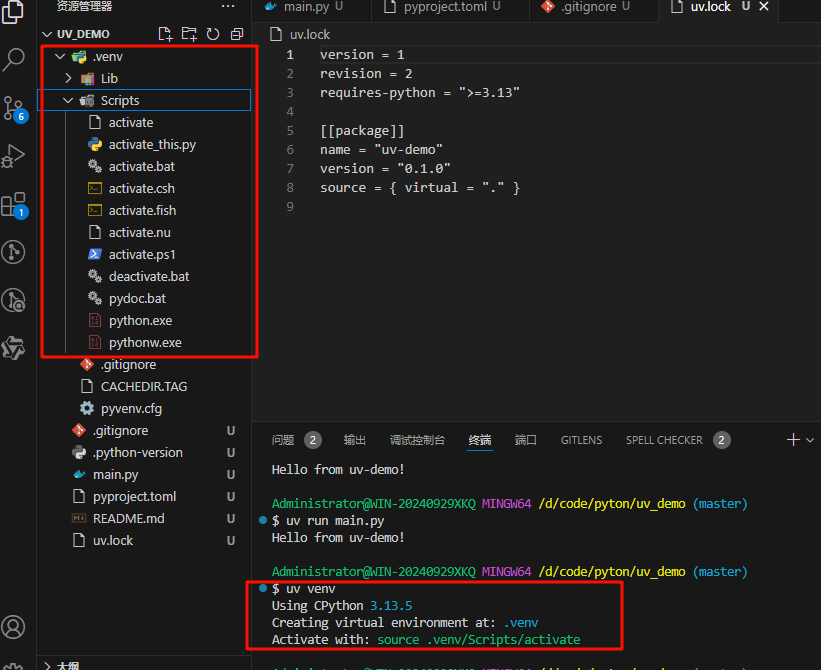
# mac 激活.venv下的虚拟环境
wanghaima@wanghaimadeMacBook-Pro curldiff % source .venv/bin/activate
(deepdiff-tool) wanghaima@wanghaimadeMacBook-Pro curldiff %

# windows 激活venv下的虚拟环境
Administrator@haima-PC MINGW64 /d/code/python/requests_demo
$ source env/Scripts/activate
(env)

# 退出.venv下的虚拟环境
(deepdiff-tool) wanghaima@wanghaimadeMacBook-Pro curldiff % deactivate
wanghaima@wanghaimadeMacBook-Pro curldiff %
运行
main.py文件Administrator@WIN-20240929XKQ MINGW64 /d/code/pyton/uv_demo (master) $ uv run main.py Using CPython 3.13.5 Creating virtual environment at: .venv Hello from uv-demo!安装依赖包
7.1 uv add numpy pandas 安装依赖包
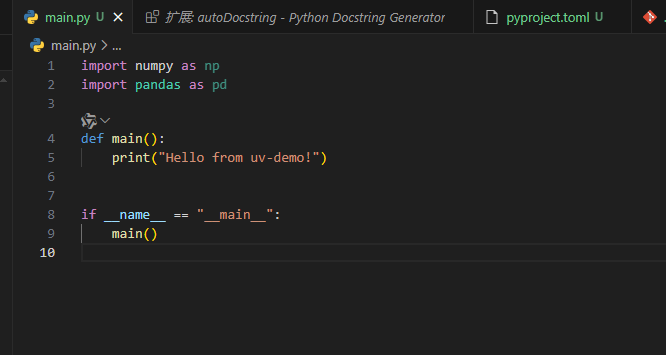
Administrator@WIN-20240929XKQ MINGW64 /d/code/pyton/uv_demo (master)
$ uv add numpy=3.10.0 pandas
Resolved 7 packages in 3.17s
Prepared 6 packages in 5.71s
░░░░░░░░░░░░░░░░░░░░ [0/6] Installing wheels...
warning: Failed to hardlink files; falling back to full copy. This may lead to degraded performance.
         If the cache and target directories are on different filesystems, hardlinking may not be supported.
         If this is intentional, set `export UV_LINK_MODE=copy` or use `--link-mode=copy` to suppress this warning.
Installed 6 packages in 1.71s
 + numpy==2.3.0
 + pandas==2.3.0
 + python-dateutil==2.9.0.post0
 + pytz==2025.2
 + six==1.17.0
 + tzdata==2025.2
安装好后,会记录在 pyproject.toml 文件中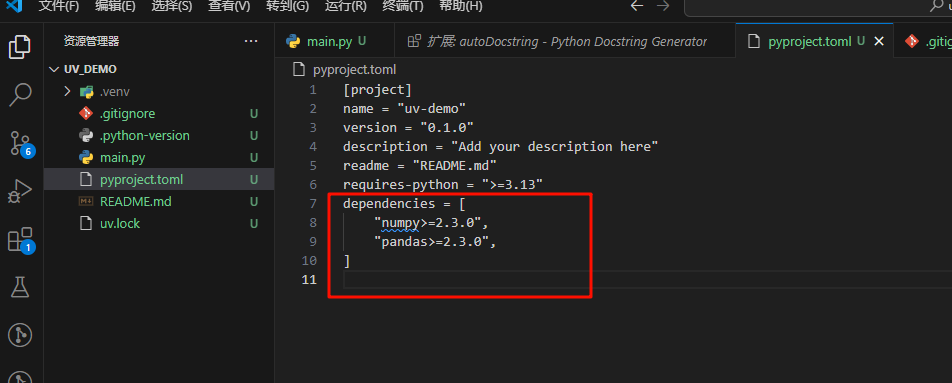
7.2 uv pip install
不推荐使用,安装的包不会被记录到 pyproject.toml 文件中
# 安装单个包
uv pip install requests

# 安装指定版本
uv pip install requests==2.31.0

# 从 requirements.txt 安装
uv pip install -r requirements.txt

# 安装到全局环境(不推荐,需退出虚拟环境)
uv pip install --system requests
移除包
8.1 uv removeAdministrator@WIN-20240929XKQ MINGW64 /d/code/pyton/uv_demo (master) $ uv remove numpy Resolved 7 packages in 28ms Audited 6 packages in 0.04ms8.2 uv pip uninstall # 不推荐使用
uv pip uninstall requests升级包
# 升级单个包
uv pip upgrade requests

# 升级所有包
uv pip upgrade --all
- 导出依赖
# 生成 requirements.txt(类似 pip freeze)
uv pip freeze > requirements.txt

# 生成精确的锁定文件(推荐,确保依赖一致性)
uv pip compile requirements.txt -o requirements.lock- 依赖解析与锁定
# 生成锁定文件(基于 pyproject.toml)
uv lock

# 根据锁定文件安装依赖
uv sync- 查看库依赖
Administrator@WIN-20240929XKQ MINGW64 /d/code/pyton/uv_demo (master)
$ uv tree
Resolved 7 packages in 2ms
uv-demo v0.1.0
├── numpy v2.3.0
└── pandas v2.3.0
    ├── numpy v2.3.0
    ├── python-dateutil v2.9.0.post0
    │   └── six v1.17.0
    ├── pytz v2025.2
└── tzdata v2025.2- 自动同步项目环境依赖
前提是要有 pyproject.toml 和 uv.lock 两个文件
Administrator@WIN-20240929XKQ MINGW64 /d/code/pyton/uv_demo (master)
$ uv sync
Using CPython 3.13.5
Creating virtual environment at: .venv
Resolved 7 packages in 2ms
░░░░░░░░░░░░░░░░░░░░ [0/6] Installing wheels...
warning: Failed to hardlink files; falling back to full copy. This may lead to degraded performance.
         If the cache and target directories are on different filesystems, hardlinking may not be supported.
         If this is intentional, set `export UV_LINK_MODE=copy` or use `--link-mode=copy` to suppress this warning.
Installed 6 packages in 1.78s
 + numpy==2.3.0
 + pandas==2.3.0
 + python-dateutil==2.9.0.post0
 + pytz==2025.2
 + six==1.17.0
+ tzdata==2025.2- 或者从
requirements.txt中同步项目依赖 ,兼容老项目uv add -r requirements.txt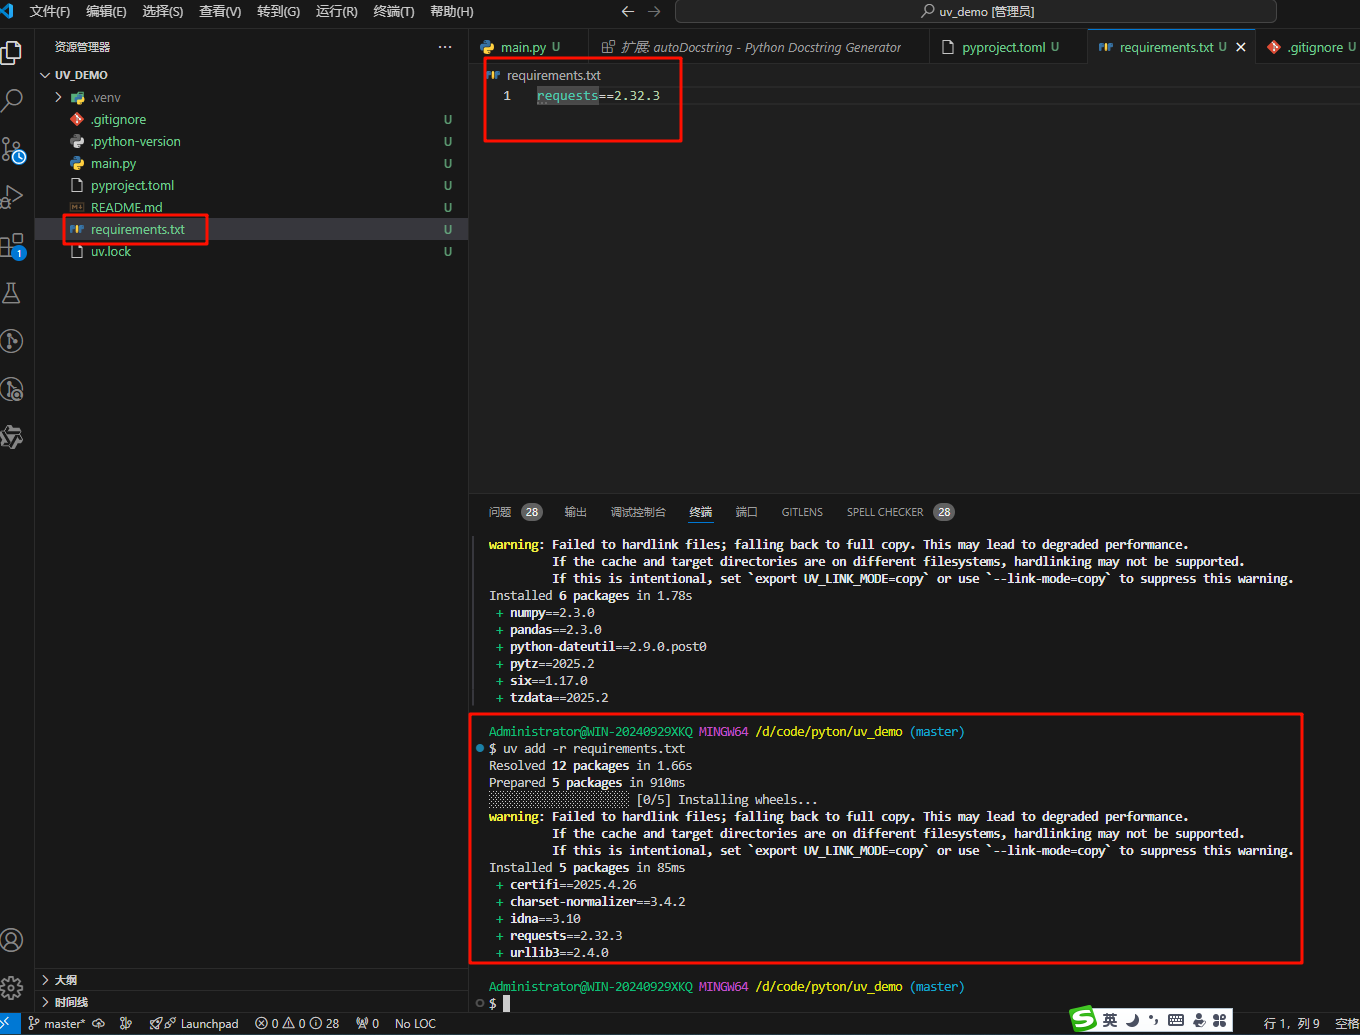
- 如何切换项目中使用的
python版本
12.1 修改版本
方法一:
如果原来是3.13版本,想切换为3.12版本,需要修改下面2个文件的python版本号

修改完版本号后使用:uv run main.py,在执行代码时,会删除原本

方法二:
如项目下 .python-version文件中记录的当前项目的版本为3.10`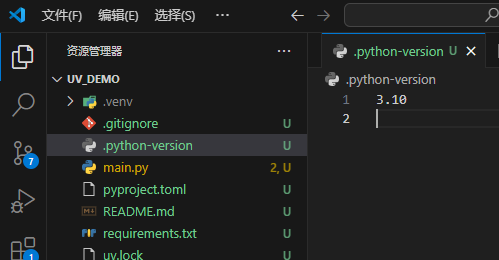
12.2 删除 .venv 虚拟环境目录rm -rf .venv
12.3 切换 python 版本为 3.13
uv python pin 3.13
12.4 修改 pyproject.toml 和 uv.lock 两个文件里的python版本为 3.13requires-python = ">=3.13"
12.5 同步依赖uv sync
至此已经切换项目版本成功
下以是执行过程
Administrator@WIN-20240929XKQ MINGW64 D:/Program Files (x86)/Microsoft VS Code (master)
$ rm -rf .venv
(uv-demo)
Administrator@WIN-20240929XKQ MINGW64 D:/Program Files (x86)/Microsoft VS Code (master)
$ uv python pin 3.13
Updated `.python-version` from `3.10` -> `3.13`
(uv-demo)
Administrator@WIN-20240929XKQ MINGW64 D:/Program Files (x86)/Microsoft VS Code (master)
$ uv sync
Using CPython 3.13.5
Creating virtual environment at: .venv
Resolved 12 packages in 58ms
Prepared 3 packages in 3.80s
░░░░░░░░░░░░░░░░░░░░ [0/11] Installing wheels...
warning: Failed to hardlink files; falling back to full copy. This may lead to degraded performance.
         If the cache and target directories are on different filesystems, hardlinking may not be supported.
         If this is intentional, set `export UV_LINK_MODE=copy` or use `--link-mode=copy` to suppress this warning.
Installed 11 packages in 1.54s
 + certifi==2025.4.26
 + charset-normalizer==3.4.2
 + idna==3.10
 + numpy==2.3.0
 + pandas==2.3.0
 + python-dateutil==2.9.0.post0
 + pytz==2025.2
 + requests==2.32.3
 + six==1.17.0
 + tzdata==2025.2
 + urllib3==2.4.0
(uv-demo) - 缓存管理:uv cache
uv add 安装的包会产生缓存
Administrator@WIN-20240929XKQ MINGW64 /d/Users/Administrator/Desktop
$ uv cache -h
Manage uv's cache

Usage: uv.exe cache [OPTIONS] <COMMAND>

Commands:
  # 清除缓存,删除所有条目或与特定软件包相关的条目
  clean  Clear the cache, removing all entries or those linked to specific packages
  # 清除缓存中所有不可达的对象
  prune  Prune all unreachable objects from the cache
  # 显示uv add 产生的缓存目录
  dir    Show the cache directory
实操
# 显示缓存目录
Administrator@WIN-20240929XKQ MINGW64 /d/Users/Administrator/Desktop
$ uv cache dir
C:\Users\Administrator\AppData\Local\uv\cache
# 进入缓存目录
Administrator@WIN-20240929XKQ MINGW64 /C/Users/Administrator/AppData/Local/uv/cache
$ ls /C/Users/Administrator/AppData/Local/uv/cache
CACHEDIR.TAG  archive-v0/  builds-v0/  interpreter-v4/  sdists-v9/  simple-v16/  wheels-v5/
# 清除缓存中所有不可达的对象
Administrator@WIN-20240929XKQ MINGW64 /C/Users/Administrator/AppData/Local/uv/cache
$ uv cache prune
Pruning cache at:
Removed 32 files (273.4KiB)
# 显示缓存cache目录下的内容
Administrator@WIN-20240929XKQ MINGW64 /C/Users/Administrator/AppData/Local/uv/cache
$ ls /C/Users/Administrator/AppData/Local/uv/cache
CACHEDIR.TAG  archive-v0/  builds-v0/  interpreter-v4/  sdists-v9/  simple-v16/  wheels-v5/

# 清除缓存中所有不可达的对象
Administrator@WIN-20240929XKQ MINGW64 /d
$ uv cache clean
Clearing cache at: C:\Users\Administrator\AppData\Local\uv\cache
Removed 1 directory

# 已经删除cache目录
Administrator@WIN-20240929XKQ MINGW64 /d
$ ls /C/Users/Administrator/AppData/Local/uv/cache
ls: cannot access '/C/Users/Administrator/AppData/Local/uv/cache': No such file or directory
参考视频:
最后编辑:海马 更新时间:2026-01-30 20:34
